Enhancing your outdoor property with a stylish and durable timber fence is a practical and rewarding undertaking for many Australian homeowners in 2026. Whether you are seeking a secure boundary, improved privacy, or simply a charming garden fence, embracing a DIY approach to timber fence installation offers significant economic benefits and customization flexibility. Timber fencing remains a top choice across Australia due to its natural beauty, adaptability to various styles, and suitability for diverse climatic conditions.
DIY timber fencing projects are increasingly accessible thanks to modern design advancements and quality materials readily available from suppliers like A Class Building Materials and regional experts such as Ballarat Timber Supplies. This step-by-step guide will lead you through the essential stages of planning, material selection, and construction techniques, ensuring a professional outcome without the labor costs. It’s an outdoor project that anyone keen on home improvement and craftwork can confidently tackle.
- Save money by eliminating professional labor fees.
- Customize your fence style and dimensions according to your property needs.
- Use high-quality materials designed to endure Australian weather.
- Increase property value while enhancing street appeal.
- Work flexibly at your own pace, fitting the project around your schedule.
Choosing the Optimal Timber for DIY Fence Installation in Australia
Selecting the right timber is critical for a fence that withstands harsh Australian conditions—from intense sun to heavy rains and termite threats. You’ll find that the two main timber categories commonly used are treated pine and hardwood, each suited to different budgets and fence purposes.
Treated Pine Timber: Affordability Meets Durability
Treated pine remains a firm favorite for budget-conscious projects. Its chemical treatment protects against rot and insects, making it suitable for boundary fences and paling designs. It’s also relatively easy to cut, drill, and handle, which is hugely advantageous for DIY enthusiasts. In 2026, innovations in treatment processes have increased pine’s lifespan, making it a more sustainable choice than ever.
Hardwood Timber: Premium Strength and Longevity
Hardwood varieties such as Spotted Gum or Ironbark offer exceptional robustness and natural resistance to weathering. Hardwood is ideal for premium fencing projects where longevity and a sophisticated appearance are priorities. However, hardwood is pricier and requires more specialized tools due to its density.
When picking timber, also consider the grade, as structural strength can vary and affect the fence’s durability. Opting for H3-treated timber for in-ground posts is also advised for extra protection against decay where timber contacts soil.
| Timber Type | Advantages | Best Use Cases | Approximate Cost Level |
|---|---|---|---|
| Treated Pine | Cost-effective, easy to work with, termite resistant (treated) | Boundary fences, paling fences | Low to Medium |
| Hardwood | Long-lasting, strong, natural weather resistance | Premium fencing, decorative features | High |
Reliable advice and sourcing from trusted suppliers such as Geelong Timber Supplies’ DIY fencing guide can help ensure you choose the right timber for your climate and design preferences.
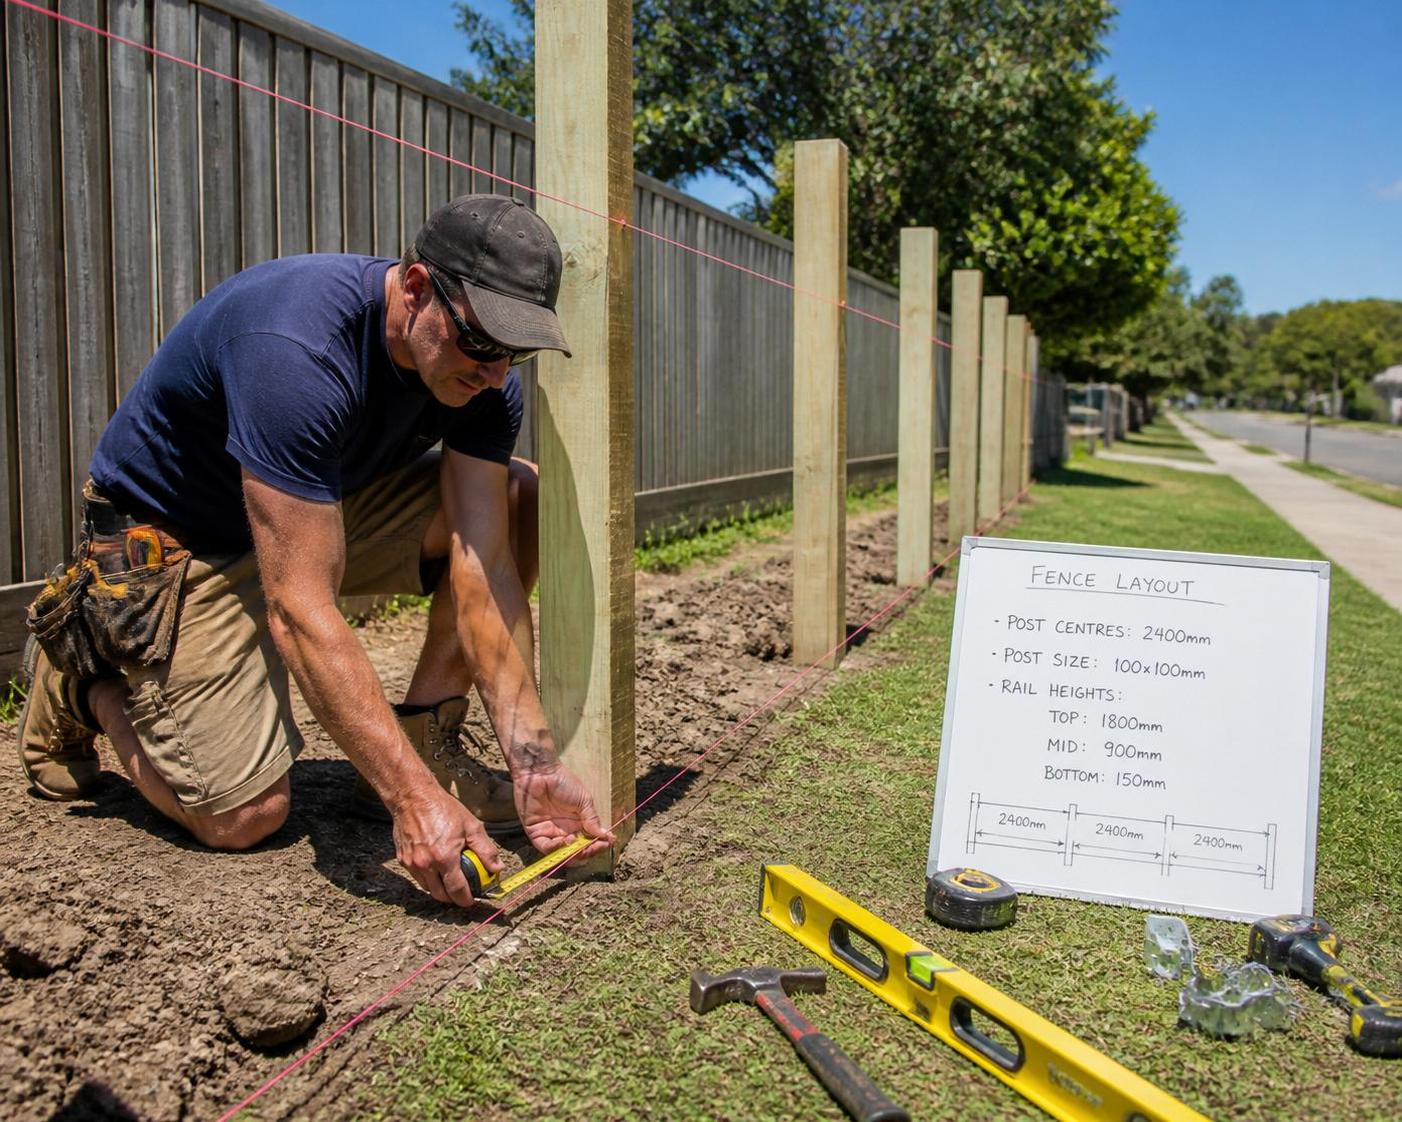
Comprehensive Planning and Precise Measuring for Your Timber Fence
Before any digging or woodworking begins, accurate planning is essential. Proper mapping and measurement help prevent material wastage and alignment issues that might compromise the integrity and aesthetic of your new fence.
Mapping Your Fence Line
Start by defining the exact property boundary where you want your fence. Many Australian councils have regulations regarding fencing, so consider consulting local authorities to ensure compliance with rules, height restrictions, and required permits. Services like Boomba Fencing’s guide on fencing regulations across Australian states provide valuable insights.
Once the line is established, use string lines and stakes to mark post positions, aiming for uniform spacing, typically between 2.4 to 3 meters. This spacing balances cost-effectiveness and structural stability. Precise measurements prevent uneven fence panels and reduce future maintenance needs.
Measurement Techniques and Tools
Use reliable tape measures and laser distance measurers for accuracy. Measurement errors are one of the most common mistakes leading to costly adjustments or material shortage during fence installation.
Double-check every mark and measure twice before you dig or cut. Mark post footing locations carefully, considering any slopes or curves in your landscape to maintain consistent height and alignment.
Consider factors such as gate positions and access points in your layout to guarantee optimal usability post-installation, especially when planning a garden fence or boundary fencing for entryways and pathways.
Essential Tools and Materials for DIY Timber Fence Installation
Gathering all necessary materials and tools before starting saves time and streamlines your entire building fence project. Having everything at hand avoids interruptions and ensures workflow consistency.
Core Timber Materials
- Timber posts: serve as the primary support structure;
- Rails: horizontal supports connecting posts;
- Palings or boards: vertical slats providing privacy and aesthetics;
- Timber capping: finishing touch to prevent water ingress and improve appearance;
- Concrete mix: crucial for securely setting posts;
Tools and Safety Equipment
- Measuring tape and spirit level to ensure accuracy;
- Power drill or impact driver for fixing screws;
- Post hole digger or auger for creating consistent holes;
- Hammer and galvanized nails or screws suitable for outdoor use;
- Safety gear including gloves, eye protection, and hearing protection;
Ensuring you have quality fasteners and tools designed for outdoor timber fence installation is essential for long-lasting results. Suppliers like A Class Building Materials offer comprehensive kits perfectly tailored for DIY fencing projects.
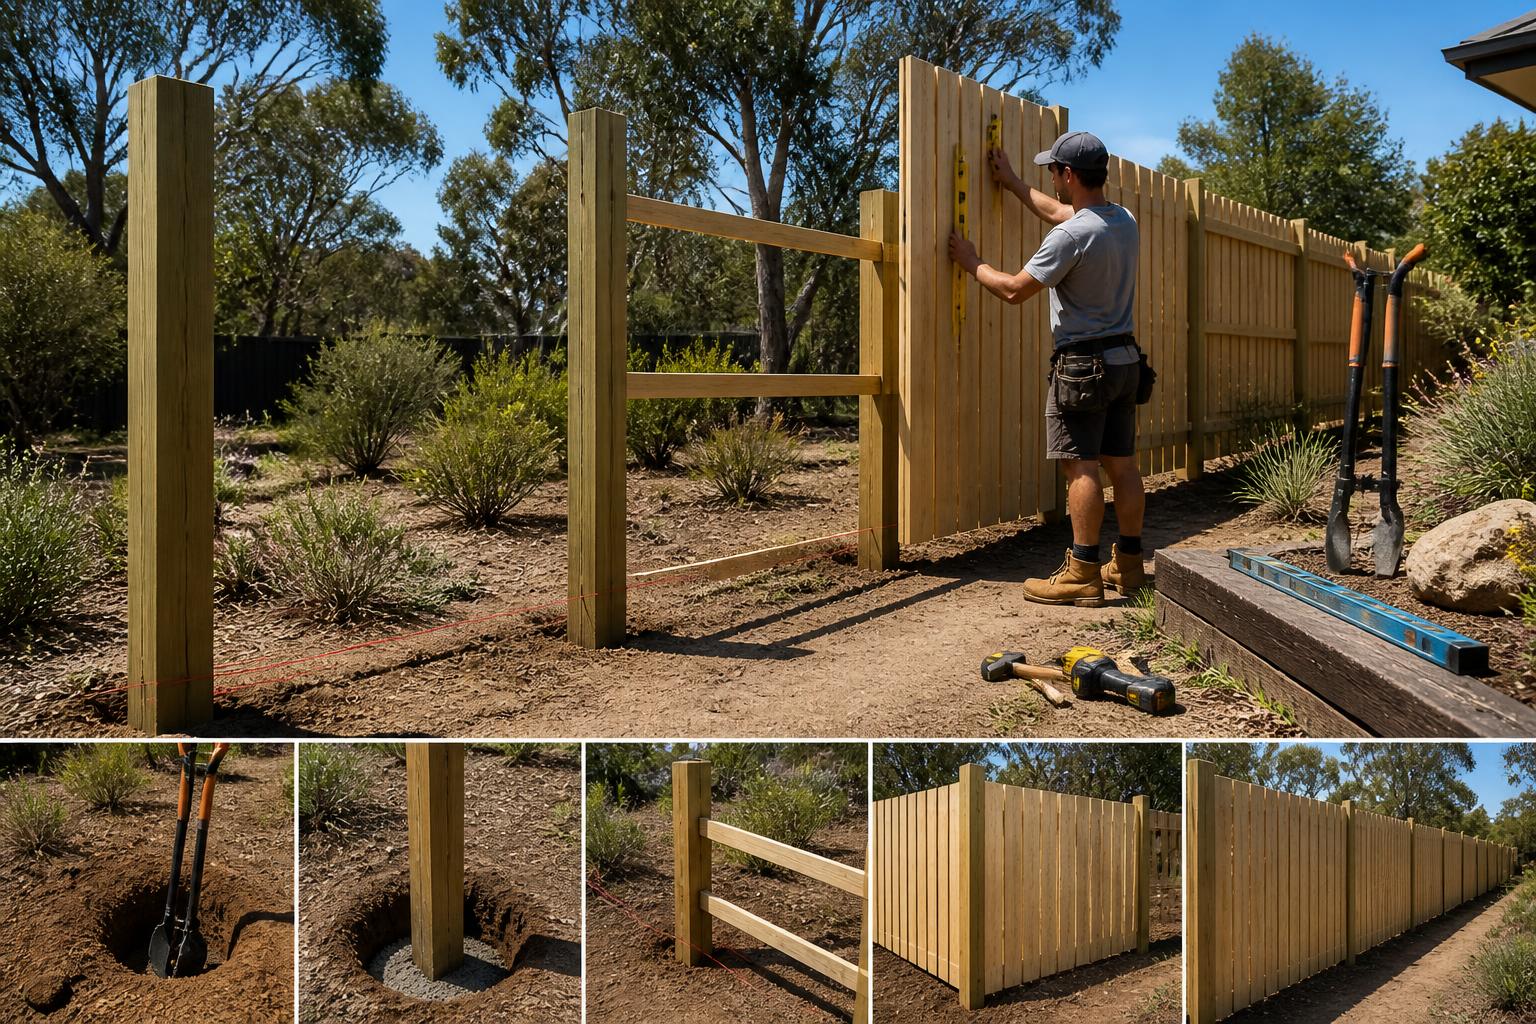
Step-by-Step Process: Installing Your Timber Fence Like a Pro
The fence installation process is systematic and requires attention to detail at each step. Laying solid foundations is paramount since the fence’s durability hinges on how well the posts are installed.
Installing Timber Posts
Begin by digging post holes approximately 600 mm deep, adjusting depth according to soil condition and frost line guidelines. Position posts within the holes, ensuring they are vertical using a spirit level. Subsequently, pour concrete around the base for stability, and allow it to cure fully before attaching other components.
Attaching Rails and Palings
Once posts are firmly set, attach two or three horizontal rails between posts. These rails bear the load and provide surface area for securing timber palings. Palings should be fixed evenly with galvanized screws or nails, maintaining consistent spacing for optimal appearance and privacy.
Adding Capping and Finishing Touches
Install timber capping to cover the top rail and paling ends, which helps prevent water damage and prolongs fence life. Finish your fence with a suitable sealant, stain, or paint formulated for Australian outdoor conditions to protect against UV damage and decay.
Regular inspection and maintenance, such as tightening fasteners or reapplying protective coatings, contribute to your fence’s longevity and pristine condition.
Practical Tips and Common Pitfalls to Avoid in DIY Timber Fence Installation
Success in timber fence installation depends not only on following steps but also on attention to detail and avoiding frequent mistakes.
- Double-check measurements before cutting and digging;
- Use adequately treated timber for ground contact posts to prevent rot;
- Always use concrete for setting posts to ensure long-term stability;
- Choose weather-resistant finishes suitable for the harsh Australian climate;
- Inspect fence regularly for loose fittings or damage;
- Avoid low-grade timber that can warp or deteriorate prematurely;
- Consult local regulations and “dial before you dig” services before hole digging;
Being vigilant with these tips ensures you save time, money, and frustration while creating a beautiful, durable timber fence. For an in-depth guide covering advanced tips, check resources such as Making Home’s timber fence build guide and expert advice from That’s Fencing tailored for Australian homeowners.
What is the best timber for fencing in Australia?
Treated pine timber is widely regarded as the best option due to its affordability, durability, and effective treatment against pests, making it suitable for most residential fencing projects.
How far apart should timber fence posts be spaced?
The standard post spacing ranges between 2.4 to 3 meters, depending on the fence design and terrain, ensuring structural strength and optimal support for rails and palings.
What depth should fence posts be installed for stability?
Fence posts should typically be set at around 600 to 800 mm deep or at least one-third the length of the post to maintain stability under Australian soil conditions.
Can I complete a timber fence installation myself?
Yes, with proper planning, quality materials, and the right tools, a DIY timber fence installation is achievable for most homeowners, as detailed in numerous step-by-step guides tailored for Australian conditions.
Do I need to contact local authorities before building a fence?
It is essential to check with local councils for permission, height restrictions, and boundary regulations to ensure your fence complies with regional requirements and avoids disputes.